


How To Upcycle A Scarf Into Summer Shorts With Optional Side Pockets
- Aug 2, 2018
- 5 min read
Get out your sewing machine and an old, unused scarf and make some funky shorts for the summer!

Step one making a pattern
If you are making a pair of shorts for yourself, get a pair that you like the fit of.

Fold them in half as evenly as possible (if they have front pockets make sure they are on the outside) and place them on some baking paper/tracing paper or whatever you have available and draw around them.
Add an inch on the bottom and sides for seam allowance and 1.5 inches on the top for a waistband.
Cut the pattern out with scissors.
Use the pattern to trace another one so you have two half patterns to work with.
Step two making the shorts

Here I got an old silk scarf from Oxfam that is big enough to make into shorts. The measurements were 35” x 34” and I folded the fabric in half with right sides together.
As the scarf was heavily patterned, I wanted to get the patterns matching when sewing the shorts.
Cutting out the pattern.

To achieve this, I used the black edges around the scarf as a guide and placed the bottom of the pattern (the leg hole) in line with the black band. So, the two sides had the same pattern on them.
You should have two pieces for the right leg and another two pieces of fabric for the left leg once you have cut them out. In total there should be four pieces to make this garment.
*please note, if you are wanting to add pockets, scroll down to step 3 and follow further instructions*
Sewing the sides of the shorts together.
Making sure right sides are together and patterns are matching, pin along the side of the shorts and sew them using a straight stitch. [follow dotted yellow line in photo below] I also back stitched to ensure security in the stitching.

Using the foot as a guide, I was able to determine how wide the seam would be and I went back over using a zig-zag stitch to prevent fraying of the fabric.
Repeat this step for the other two pieces of fabric to make another side
Sewing the shorts together.

Now you have the sides of the shorts all ready to go! Open up the two pieces and line them together with right sides facing each other and the wrong sides facing out on a flat surface.
Next you need to pin the rounded sides together, make sure you do this as evenly as possible.
Then, you sew the rounded sides with a straight stitch, [dotted yellow line in photo below] making sure you also back stitch to secure the stitches and perform a zig-zag stitch to again help fray prevention.

Sewing the crotch together.
For the next step, we need to pick up the seam we have running along the middle of the shorts and do the same for the other side. Then place these seams on the sides and we now have a pair of recognisable shorts that are inside out!

Now we need to sew the inner thigh seams to form the crotch in the shorts. To do this flatten the fabric so the crotch can easily be seen. Match the fabric underneath with the one facing you, pin and sew a straight stitch [follow yellow dotted line in picture below] and go over with a zig zag stitch to reduce fraying.

Hemming the shorts.
We have done the hard bit and made a pair of shorts, now we need to neaten them up a bit!

Again, I used the zig-zag stitch to stitch all the way around both legs and the waistband to avoid fraying. Using Bondaweb, I ironed a neat edge that would stay in place to enable a final stitch around the leg.

You don’t have to use Bondaweb, simply ironing a few centimetres of the fabric over would be enough.
Repeated this for the other leg and the waistband.
Creating the fastening.
As this was an upcycle project with Oxfam, I reused as much material as I could from the scarf. The black border worked perfectly, I cut four strips out and then sewed loops onto the shorts to fit a belt through them.
Step Three Adding Inseam pockets (side pockets)
Lucky for you, if you wish to add pockets and impress people with your sensational sewing skills it is very simple to do so!
So, you have already cut out the pieces to make the shorts and now we need to make a pattern for the pockets.
Using tracing paper or grease proof paper, whatever you have measure out how wide you need them to be, using the widest part of your hand. (The first time I tried this, I couldn’t fit my hands in the pockets – so this is important!) Then create a pointed teardrop shape and cut out two (one for the left pocket and another for the right.)
Fold the fabric in half and pin both pocket patterns on it and cut around the pattern. You should have four pieces - two for the left pocket and two for the right pocket.

**Choose your fabric that you wish to use for the pockets. This can be the same fabric as your shorts or you can use something else; the choice is yours because you are the one making the shorts! In this example the fabric is yellow and was scrap from another project. An A3 size would be plenty to work with.
Next you need to sew one piece of the pocket pattern onto the side of the shorts (right sides facing together) You can refer to your own shorts for placement of the pockets. For this example, I measured 3.5 inches from the waist (1.5 inches included for hemming of the waist) Repeat this for all four pieces of the shorts and pocket.
Once you have connected one pocket and one short piece together, place the shorts piece right side facing up and turn the pocket over.
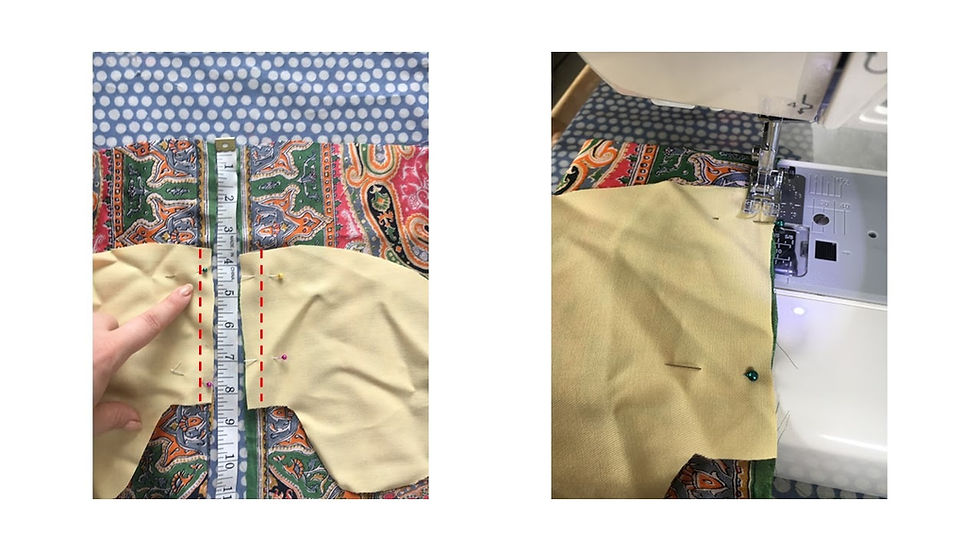
Place right sides of each leg together with the pocket out. Pin the top of the side, all around the pocket and the rest of the side seams of the shorts together as shown in the picture below. Repeat this for the other leg.

Sew where you have pinned follow the red dotted line on the picture above for reference. I found this video on Youtube by Nadria useful: https://www.youtube.com/watch?v=YkCfXzzlHNc&t=66s
I demonstrate the inseam pockets, but Nadria also shows you how to put in front hip pockets too.
Now you have added pockets, scroll back to paragraph 'Sewing the shorts together' and follow the continued steps to create your pair of shorts!
And here is the completed pair of shorts with an added yellow belt, I made from scrap materials.

Good luck and have fun using old garments, getting creative and turning them into something else!
Comments